> ## Documentation Index
> Fetch the complete documentation index at: https://docs.t3planet.de/en/latest/llms.txt
> Use this file to discover all available pages before exploring further.
# Guide to Free Version
> The free version does not include the TYPO3 backend module.
The free version does not include the TYPO3 backend module. It only provides the frontend meta-data script, which should be configured in the Settings module.
## Install Free version
You can efficiently utilise the extension manager.
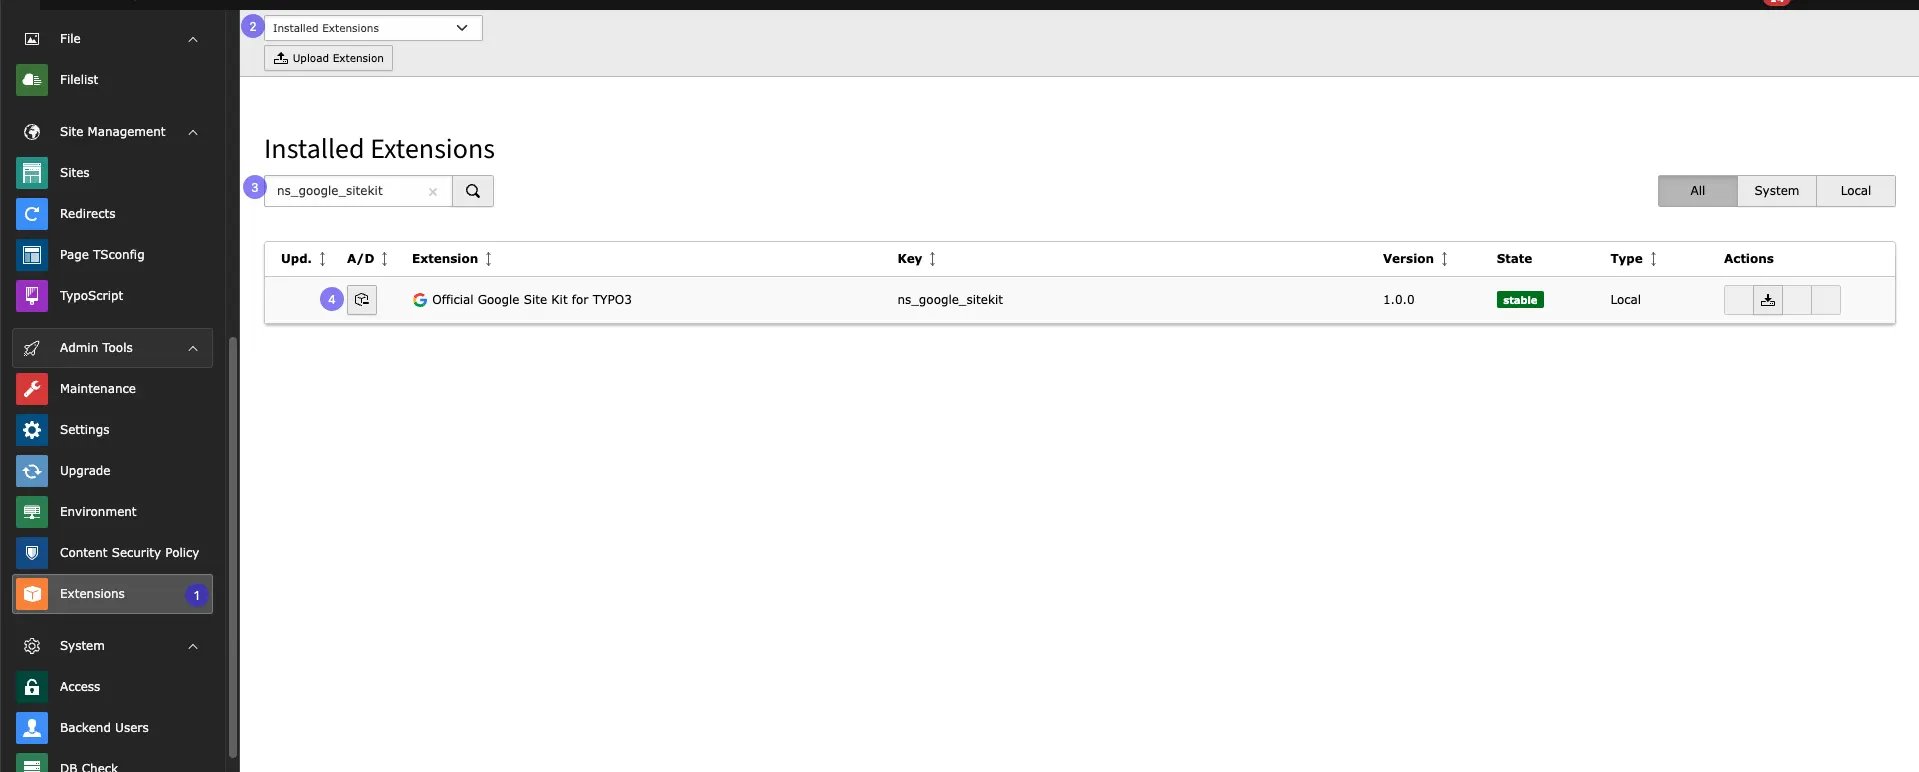 * **Step 1:** Navigate to the “Extension Manager” module.
* **Step 2:** Select “Get the extension” from the dropdown menu.
* **Step 3:** Search with the Extension Key “ns\_google\_sitekit”
* **Step 4:** Click the ” Retrieve/Update ” Button to Import the Extension From the repository.
Download the Latest Version from typo3.org: [https://extensions.typo3.org/extension/ns\_google\_sitekit](https://extensions.typo3.org/extension/ns_google_sitekit) by downloading the t3x or zip version. Upload the file afterwards in the Extension Manager.
## Configure Google Meta-data
After installing the free version of the extension, you need to configure IDs for the Google site key in the settings.
Follow below steps to configure it!
* **Step 1:** Navigate to the “Extension Manager” module.
* **Step 2:** Select “Get the extension” from the dropdown menu.
* **Step 3:** Search with the Extension Key “ns\_google\_sitekit”
* **Step 4:** Click the ” Retrieve/Update ” Button to Import the Extension From the repository.
Download the Latest Version from typo3.org: [https://extensions.typo3.org/extension/ns\_google\_sitekit](https://extensions.typo3.org/extension/ns_google_sitekit) by downloading the t3x or zip version. Upload the file afterwards in the Extension Manager.
## Configure Google Meta-data
After installing the free version of the extension, you need to configure IDs for the Google site key in the settings.
Follow below steps to configure it!
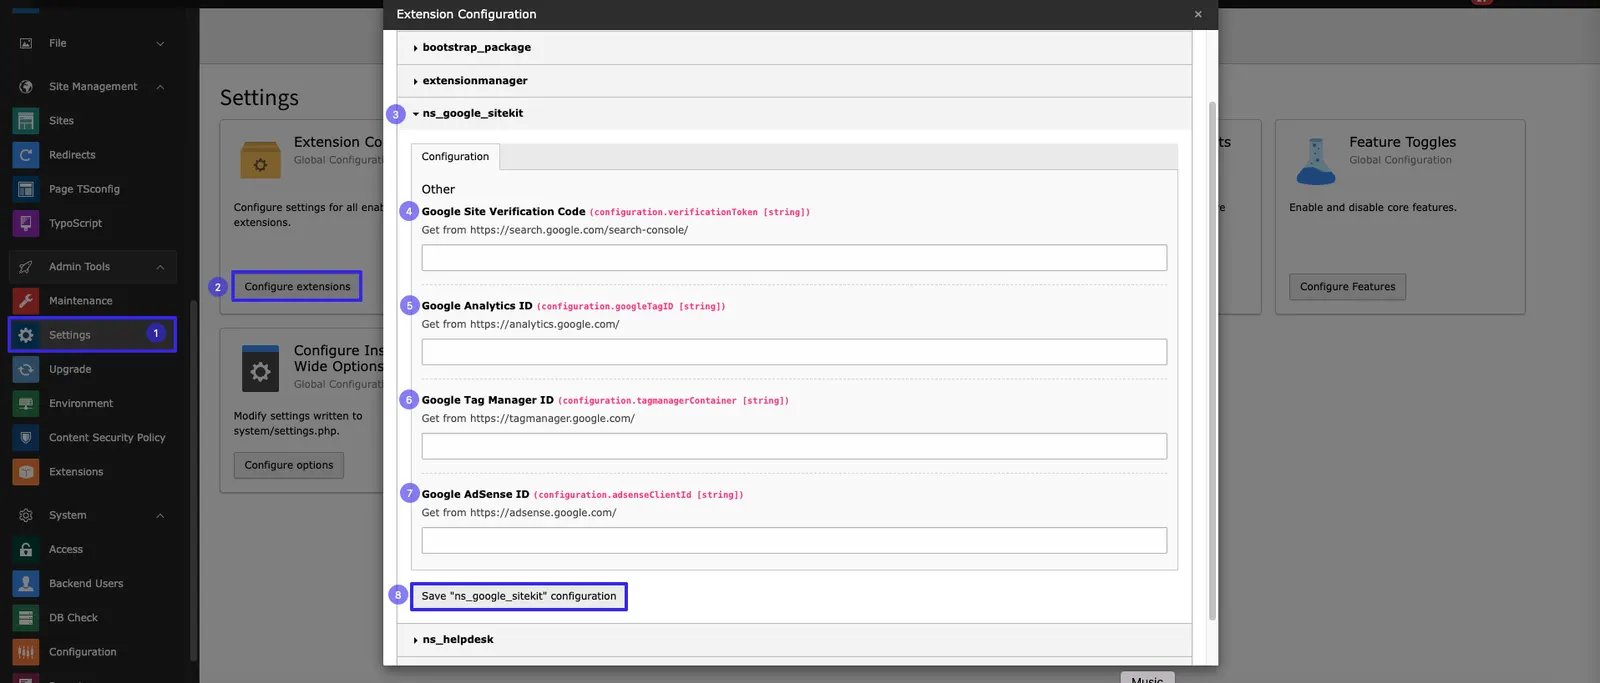 * **Step 1:** Go to **Settings** module
* **Step 2:** Click on **Configure Extensions**
* **Step 3:** Select **ns\_google\_sitekit**
* **Step 4:** Add **Google Site Verification code**
* **Step 5:** Add **Google Analytics ID**
* **Step 6:** Add **Google Tag Manager ID**
* **Step 7:** Add **Google Adsense ID**
* **Step 8:** Save configurtion by clicking **Save "ns\_google\_sitekit" configuration**
You Can Generate all this Code and ID from the [Google Site verification code](https://search.google.com/search-console/), [Google Analytics ID](https://analytics.google.com/), [Google Tag Manager ID](https://tagmanager.google.com/) and [Google Adsense ID](https://adsense.google.com/).
* **Step 1:** Go to **Settings** module
* **Step 2:** Click on **Configure Extensions**
* **Step 3:** Select **ns\_google\_sitekit**
* **Step 4:** Add **Google Site Verification code**
* **Step 5:** Add **Google Analytics ID**
* **Step 6:** Add **Google Tag Manager ID**
* **Step 7:** Add **Google Adsense ID**
* **Step 8:** Save configurtion by clicking **Save "ns\_google\_sitekit" configuration**
You Can Generate all this Code and ID from the [Google Site verification code](https://search.google.com/search-console/), [Google Analytics ID](https://analytics.google.com/), [Google Tag Manager ID](https://tagmanager.google.com/) and [Google Adsense ID](https://adsense.google.com/).