> ## Documentation Index
> Fetch the complete documentation index at: https://docs.t3planet.de/en/latest/llms.txt
> Use this file to discover all available pages before exploring further.
# Form and Document Submission API
Before adding plugins to page configure personio APIs and Scheduler!
Please configure this API for Submitting application form and to upload Documents successfully from plugin.
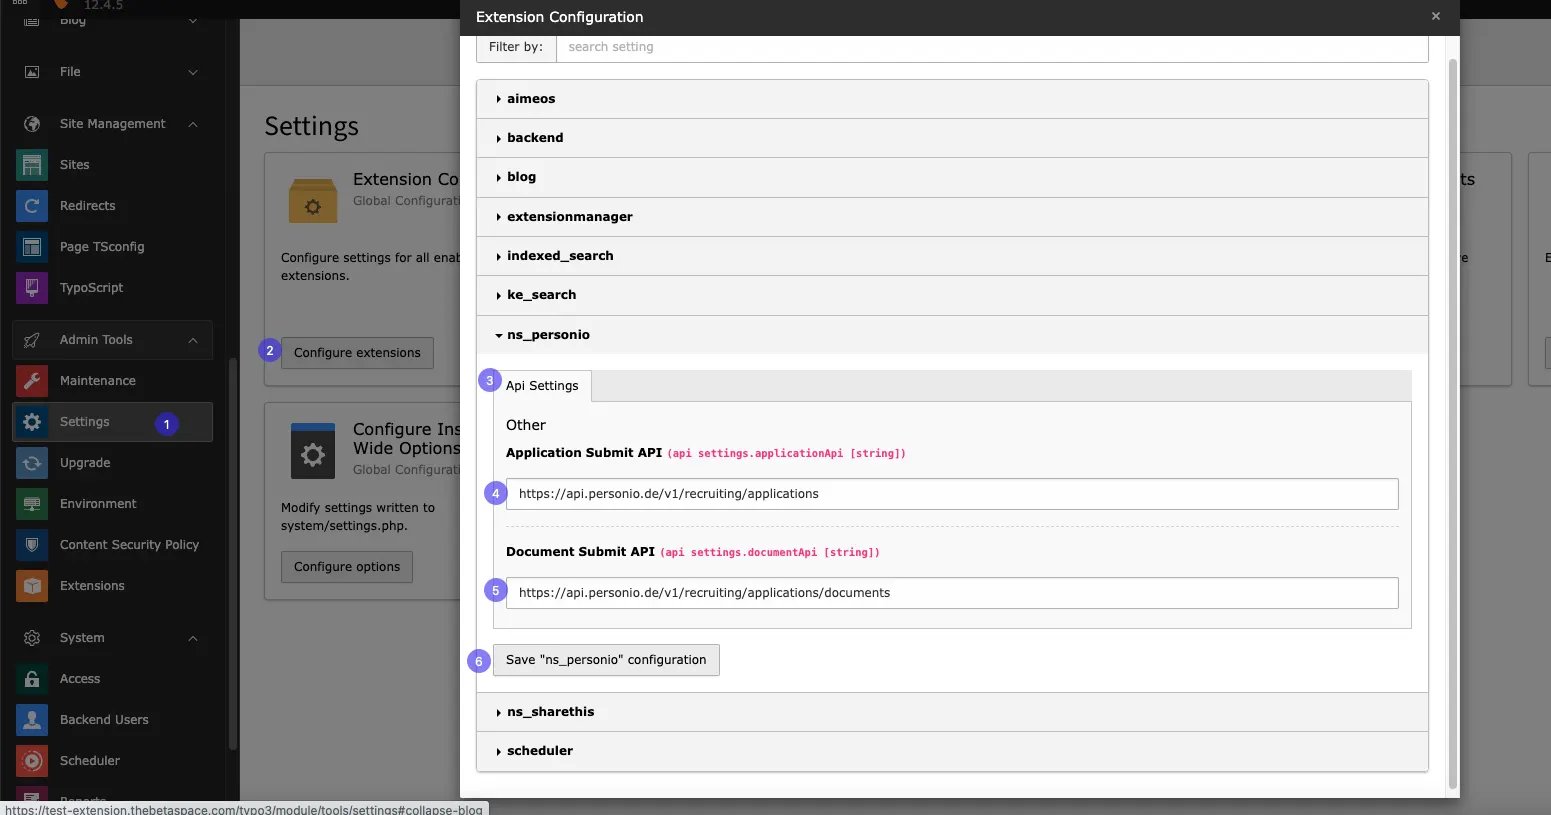 This API configuration is mandatory. Without it, users won't be able to upload documents or submit applications.
* **Application Submit API:**
[https://api.personio.de/v1/recruiting/applications](https://api.personio.de/v1/recruiting/applications)
* **Document Submit API:**
[https://api.personio.de/v1/recruiting/applications/documents](https://api.personio.de/v1/recruiting/applications/documents)
Follow Below steps to Configure API
**Step:1** Go to Admin tools>Settings
**Step:2** Click on configure extensions
**Step:3** Select ns\_personio
**Step:4** Add Application submit API
**Step:5** Add Documents Submit API and save the configuration
# Configure Scheduler
Please configure schedular for fatching Data from personio API
This API configuration is mandatory. Without it, users won't be able to upload documents or submit applications.
* **Application Submit API:**
[https://api.personio.de/v1/recruiting/applications](https://api.personio.de/v1/recruiting/applications)
* **Document Submit API:**
[https://api.personio.de/v1/recruiting/applications/documents](https://api.personio.de/v1/recruiting/applications/documents)
Follow Below steps to Configure API
**Step:1** Go to Admin tools>Settings
**Step:2** Click on configure extensions
**Step:3** Select ns\_personio
**Step:4** Add Application submit API
**Step:5** Add Documents Submit API and save the configuration
# Configure Scheduler
Please configure schedular for fatching Data from personio API
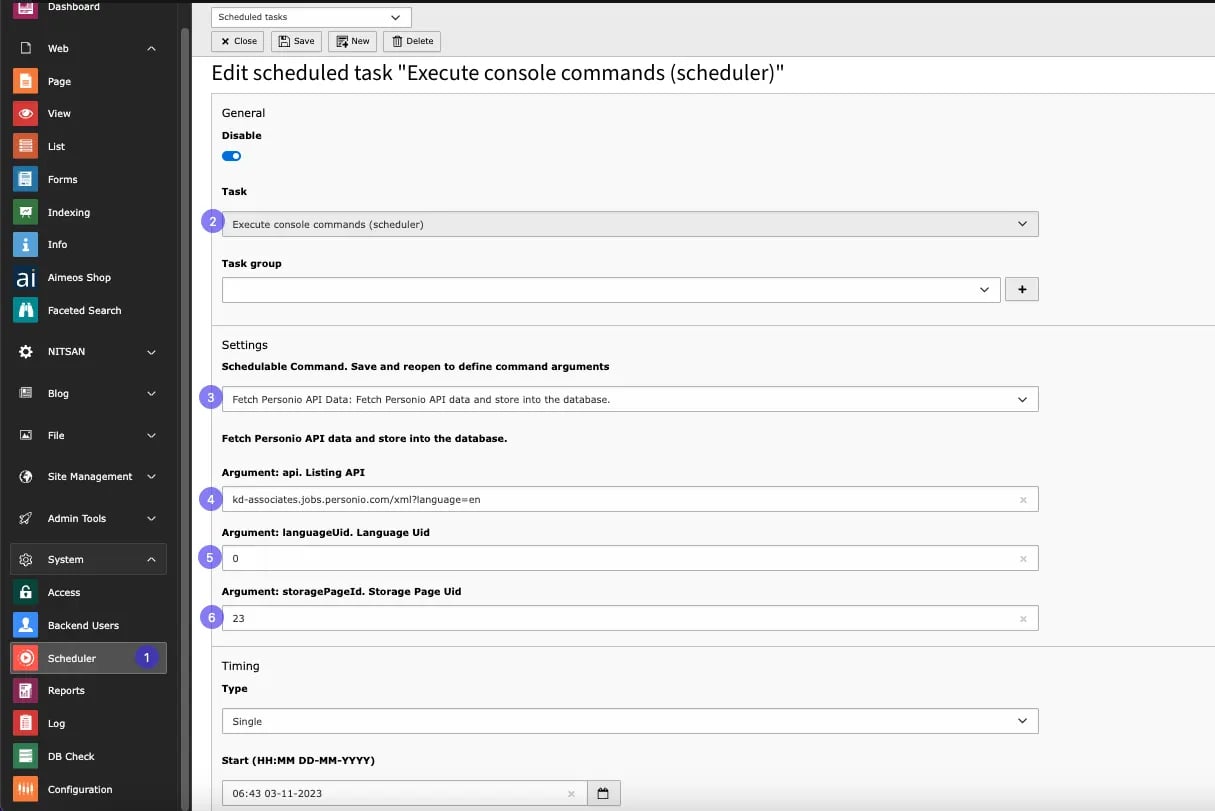 **Step:1** Go to System>Scheduler
**Step:2** Select Task
**Step:3** Select Schedulable Command
**Step:4** Add Personio Account API,You can get It from [https://support.personio.de/hc/en-us/articles/207576365-Integrate-positions-from-Personio-into-your-company-website-via-XML](https://support.personio.de/hc/en-us/articles/207576365-Integrate-positions-from-Personio-into-your-company-website-via-XML)
**Step:5** Add Language Uid from site management, you can create Multiple scheduler according to diffrent languages!
**Step:6** Page ID where to persist new or updated jobs
**All done now you can configure plugins to your pages!**
**Common setup for multi-language sites:**
One scheduler imports jobs for **one language only**. If your site has German and English, you need **two schedulers**.
For each language, configure:
1. **Personio API URL for that language** — copy it from your Personio account (German feed for German, English feed for English) and cross-verify the endpoint URL in your Personio account before saving
2. **Language UID** for that language from **Site Management > Sites**
3. **Page ID** where jobs should be stored
Example (replace with the URL from your Personio account):
* Scheduler for German → `https://YOUR_COMPANY.jobs.personio.de/xml?language=de` + German Language UID
* Scheduler for English → `https://YOUR_COMPANY.jobs.personio.de/xml?language=en` + English Language UID
Always cross-verify each language endpoint URL from your Personio account. If you create pages in both languages but only one scheduler, jobs will only be complete in that one language.
# Server-Side Cron Job Configuration
Please refer to the official [Typo3 Documentation](https://docs.typo3.org/c/typo3/cms-scheduler/main/en-/us/Installatio/CronJob/Index#unix-mac) for detailed guidance on setting up cron jobs on server.
**Example:**
```bash theme={"theme":{"light":"github-light","dark":"github-dark"}}
*/15 * * * * www /usr/local/bin/php /home/user/www/vendor/bin/typo3 scheduler:run --task=2
```
This example sets up a cron job to run a specific task (identified by --task=2) every 15 minutes.
**Step:1** Go to System>Scheduler
**Step:2** Select Task
**Step:3** Select Schedulable Command
**Step:4** Add Personio Account API,You can get It from [https://support.personio.de/hc/en-us/articles/207576365-Integrate-positions-from-Personio-into-your-company-website-via-XML](https://support.personio.de/hc/en-us/articles/207576365-Integrate-positions-from-Personio-into-your-company-website-via-XML)
**Step:5** Add Language Uid from site management, you can create Multiple scheduler according to diffrent languages!
**Step:6** Page ID where to persist new or updated jobs
**All done now you can configure plugins to your pages!**
**Common setup for multi-language sites:**
One scheduler imports jobs for **one language only**. If your site has German and English, you need **two schedulers**.
For each language, configure:
1. **Personio API URL for that language** — copy it from your Personio account (German feed for German, English feed for English) and cross-verify the endpoint URL in your Personio account before saving
2. **Language UID** for that language from **Site Management > Sites**
3. **Page ID** where jobs should be stored
Example (replace with the URL from your Personio account):
* Scheduler for German → `https://YOUR_COMPANY.jobs.personio.de/xml?language=de` + German Language UID
* Scheduler for English → `https://YOUR_COMPANY.jobs.personio.de/xml?language=en` + English Language UID
Always cross-verify each language endpoint URL from your Personio account. If you create pages in both languages but only one scheduler, jobs will only be complete in that one language.
# Server-Side Cron Job Configuration
Please refer to the official [Typo3 Documentation](https://docs.typo3.org/c/typo3/cms-scheduler/main/en-/us/Installatio/CronJob/Index#unix-mac) for detailed guidance on setting up cron jobs on server.
**Example:**
```bash theme={"theme":{"light":"github-light","dark":"github-dark"}}
*/15 * * * * www /usr/local/bin/php /home/user/www/vendor/bin/typo3 scheduler:run --task=2
```
This example sets up a cron job to run a specific task (identified by --task=2) every 15 minutes.