> ## Documentation Index
> Fetch the complete documentation index at: https://docs.t3planet.de/en/latest/llms.txt
> Use this file to discover all available pages before exploring further.
# Use the AI agent step by step
> Open the AI agent of AI Foundation on your page, ask a question, read the answer, and apply or cancel a prepared change card step by step.
## Step 1: Open the AI agent on your page
The AI agent works on the page you are editing. Select the page first.
1. Go to **Content > Layout** and select the page you want to work on in the page tree.
2. Click **Ask AI Agent** in the top bar, or press Ctrl/Cmd+Shift+K. The AI agent window opens on top of the page.
3. On first use, read the AI disclosure notice and click **Got it**.
4. Check the **context line** below the title. It shows the page the AI agent works on. Requests and changes apply to this page.
If the context line shows the wrong page, close the AI agent, select the right page in the page tree, and open the AI agent again.
## Step 2: Ask a question
1. Click into the message field at the bottom of the window.
2. Type a short request in your own words, for example:
```text theme={"theme":{"light":"github-light","dark":"github-dark"}}
Show me the details of this page.
```
3. **Optional:** in a new conversation, choose the AI provider in the dropdown below the message field. **Default: …** uses the default provider. After the first answer, the provider is fixed for this conversation.
4. Press Enter or click the send button.
 *The message field with the AI provider dropdown next to the send button.*
Start with a question that only reads data. It is the safest way to learn how the AI agent works.
## Step 3: Read the answer
1. Wait until the answer is complete. Each tool the AI agent runs is shown as a step marked **completed**.
2. For tasks with several steps, follow the **Progress** list. A step that changes data waits for your approval.
3. If the AI agent asks a follow-up question (`ask_clarification`), answer it in the message field. The AI agent asks instead of guessing.
## Step 4: Apply or cancel a change
When your request requires a change, the AI agent prepares a **change card** instead of writing data.
*The message field with the AI provider dropdown next to the send button.*
Start with a question that only reads data. It is the safest way to learn how the AI agent works.
## Step 3: Read the answer
1. Wait until the answer is complete. Each tool the AI agent runs is shown as a step marked **completed**.
2. For tasks with several steps, follow the **Progress** list. A step that changes data waits for your approval.
3. If the AI agent asks a follow-up question (`ask_clarification`), answer it in the message field. The AI agent asks instead of guessing.
## Step 4: Apply or cancel a change
When your request requires a change, the AI agent prepares a **change card** instead of writing data.
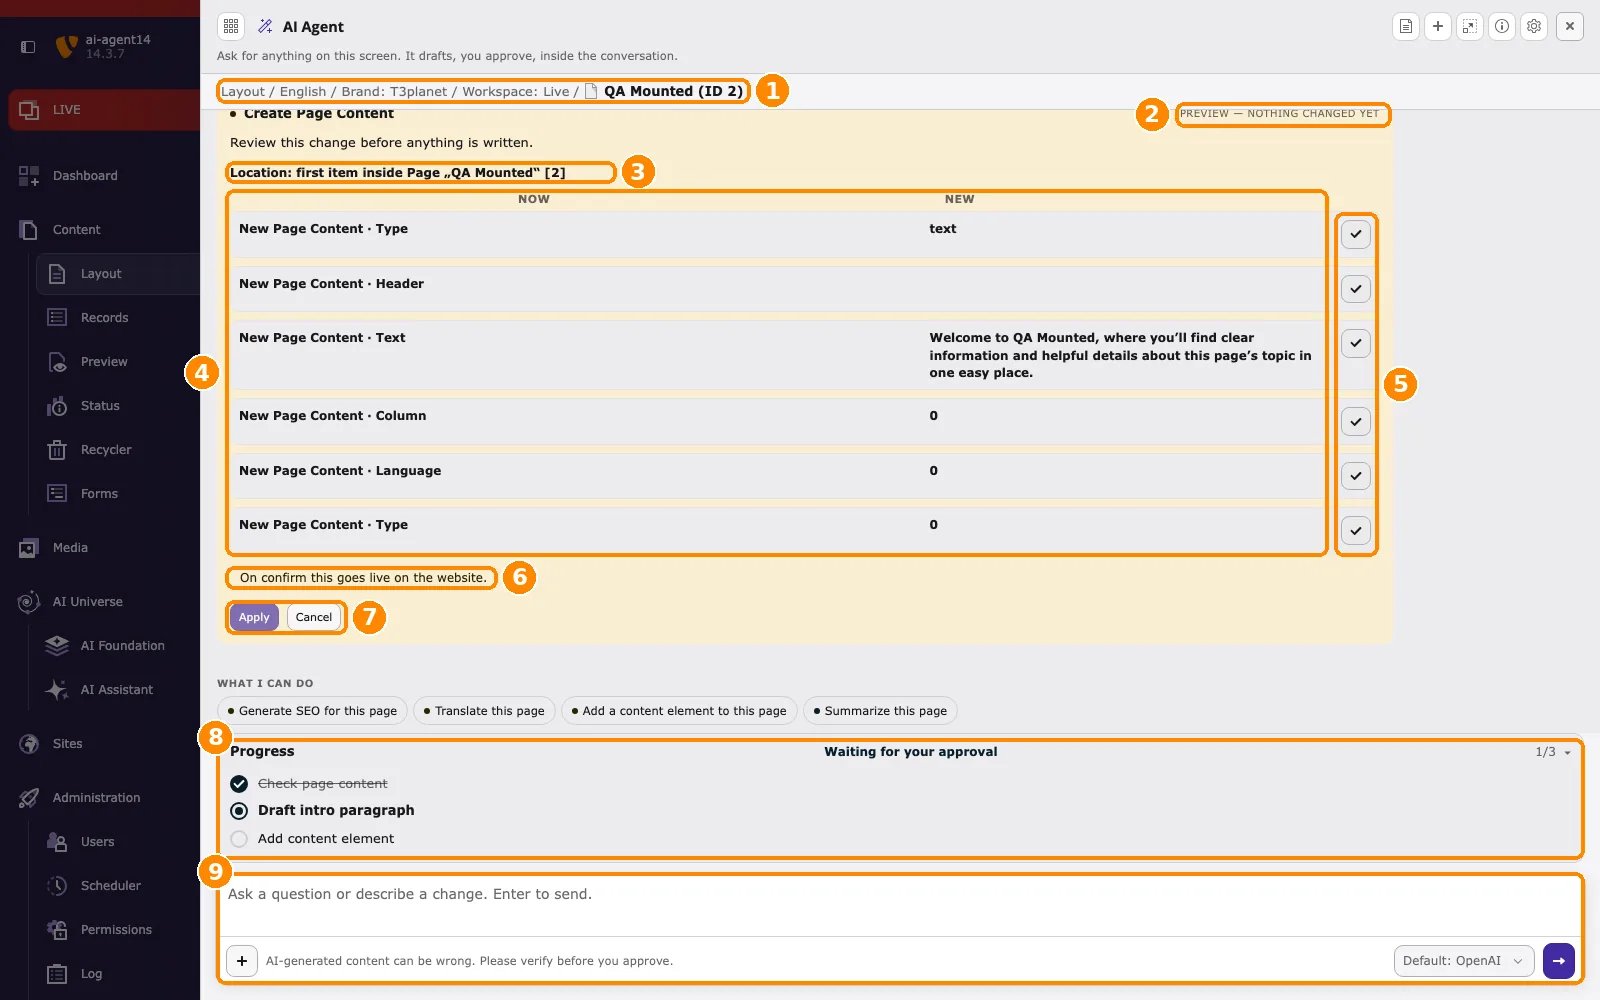 *A change card waiting for approval. The numbers match the steps below.*
1. Check the **context line** (1). It shows the page the change applies to.
2. Check the **preview badge** (2). **Preview — nothing changed yet** confirms that nothing has been written.
3. Check the **location** (3): where the record will be created or changed.
4. Compare each field (4): **Now** is the current value, **New** is the proposed value.
5. Use the **check button** (5) next to a field to include it or leave it out.
6. Read the **hint** (6) at the bottom of the card. It tells you where the change is saved. In the Live workspace it reads **On confirm this goes live on the website.**
7. Click **Apply** (7) to write the change, or **Cancel** to discard it. After **Cancel**, nothing is written.
8. The **Progress** list (8) shows **Waiting for your approval** and continues with the next step after your decision.
9. To change the request instead, type in the **message field** (9).
After **Apply**, the card shows **Changes applied** (see number 5 in the screenshot under [How it works](/en/latest/en/latest/ExtNsT3AF/AskAiAgent/HowItWorks/Index)). To revert the change, click **Undo**.
An applied change is saved in the **selected workspace**. In **Live** it is public immediately. In a draft workspace it stays in that workspace until it is published. To review changes before they go live, switch to a draft workspace first.
**Deleting needs two clicks.** The card is shown in red and states that the action cannot be undone. The first click (**Confirm (1 of 2)**) only arms the action; the second click (**Apply (2 of 2)**) runs it. **Undo** restores changed values, but it **cannot** restore deleted items.
This documentation is built and hosted on [Mintlify](https://mintlify.com), a developer documentation platform.
*A change card waiting for approval. The numbers match the steps below.*
1. Check the **context line** (1). It shows the page the change applies to.
2. Check the **preview badge** (2). **Preview — nothing changed yet** confirms that nothing has been written.
3. Check the **location** (3): where the record will be created or changed.
4. Compare each field (4): **Now** is the current value, **New** is the proposed value.
5. Use the **check button** (5) next to a field to include it or leave it out.
6. Read the **hint** (6) at the bottom of the card. It tells you where the change is saved. In the Live workspace it reads **On confirm this goes live on the website.**
7. Click **Apply** (7) to write the change, or **Cancel** to discard it. After **Cancel**, nothing is written.
8. The **Progress** list (8) shows **Waiting for your approval** and continues with the next step after your decision.
9. To change the request instead, type in the **message field** (9).
After **Apply**, the card shows **Changes applied** (see number 5 in the screenshot under [How it works](/en/latest/en/latest/ExtNsT3AF/AskAiAgent/HowItWorks/Index)). To revert the change, click **Undo**.
An applied change is saved in the **selected workspace**. In **Live** it is public immediately. In a draft workspace it stays in that workspace until it is published. To review changes before they go live, switch to a draft workspace first.
**Deleting needs two clicks.** The card is shown in red and states that the action cannot be undone. The first click (**Confirm (1 of 2)**) only arms the action; the second click (**Apply (2 of 2)**) runs it. **Undo** restores changed values, but it **cannot** restore deleted items.
This documentation is built and hosted on [Mintlify](https://mintlify.com), a developer documentation platform.