

1. AI Features (AI Foundation)
Shared AI settings for T3AS are managed in AI Foundation — not under Admin Tools > Settings > Configure Extensions. Configure AI Foundation first, then return to T3AS for search, training, and source-specific setup.- Go to the TYPO3 backend.
- Open AI Foundation → AI Features.
- Open the T3AS (
ns_t3as) feature card and configure the shared settings. - Click Save.
- Return to T3AS to continue with source, training, and search-specific settings.
AI Search Features
T3AS focuses on AI search, training, and answer delivery on top of the shared AI Foundation setup. Use these features when you want to connect project content to AI search, control answer behavior, and monitor how search performs after rollout. Key T3AS capabilities include:- Search and answer generation based on trained project content
- Data source syncing and training queue management
- Scheduler-based background processing
- Usage analytics, logs, and request statistics
- Prompt-controlled search answers and instructions
2. Dashboard
Purpose The Dashboard gives an overview of your AI training pipeline for the current site. What you see- Which AI/embedding model is in use (e.g. OpenAI, Gemini, Mistral, Custom).
- Status of the Search and Chatbot modules (if installed): active/inactive, AI engine, base model, embedding model.
- Status of your data sources and training (e.g. how many items are pending, completed, or failed).
- Training Pipeline section: data sources count, queue size, and a link to CLI reference.
- Usage Analytics summary (e.g. total interactions, search queries, chat sessions over the last 7 days).
- A link to the Scheduler to run or check the automatic training task.
3. Data Source
Purpose Add and manage the sources of content that will be used for AI search, such as website pages, PDFs, and Q&A records. Adding a data source- Click + Add Source.
-
Choose the type of source, for example:
- Sitemap XML – Your sitemap URL(s) (e.g.
https://example.com/sitemap.xml). - PDF Documents – Folder path where PDFs are stored (and optionally upload PDFs).
- TYPO3 Pages – Content from specific TYPO3 pages.
- Web Pages – A website URL; optionally limit to a path (e.g.
https://example.com/blog/*). - Q&A Pairs – Manual question-and-answer content.
- Indexed Search / Ke Search / Solr – If the corresponding extensions are installed and indexed content is available.
- Sitemap XML – Your sitemap URL(s) (e.g.
-
Fill in the requested details (URLs, folder path, page selection, etc.) and give the source a Name (e.g.
Main Website) and optional Description. - Set Sync interval: how often content should be refreshed (e.g. Hourly, Daily, Weekly). Custom means no automatic schedule (manual sync only).
- Set Used by (formerly Type) to control where this source is available.
- Set Enabled to on if the source should be active.
- Click Save.
- Create or update the data source.
- Sync content into the training queue (new or changed items).
- Automatically create the T3AF Training Scheduler task for this site (if it does not exist yet) and run it at the frequency you set (e.g. Hourly, Daily, Weekly). You do not need to create the scheduler task manually—it is created when the source is saved and will execute according to the chosen sync interval.
Source Groups | Page-Level Source Configuration
Source Groups allow administrators and editors to organize data sources and control which content is available to AI Search and the AI Chatbot on a page-by-page basis. This gives you precise control over retrieval because only the selected Source Groups are considered for that page. Source Groups are used only during content retrieval. They do not affect AI training, vector indexing, Scheduler execution, embedding generation, or data synchronization. The filtering is applied by the VectorService during retrieval.Backend Configuration
Manage Source Groups
Go to Data Sources -> Source Groups to manage Source Groups. Administrators can:- create Source Groups
- edit Source Groups
- delete Source Groups
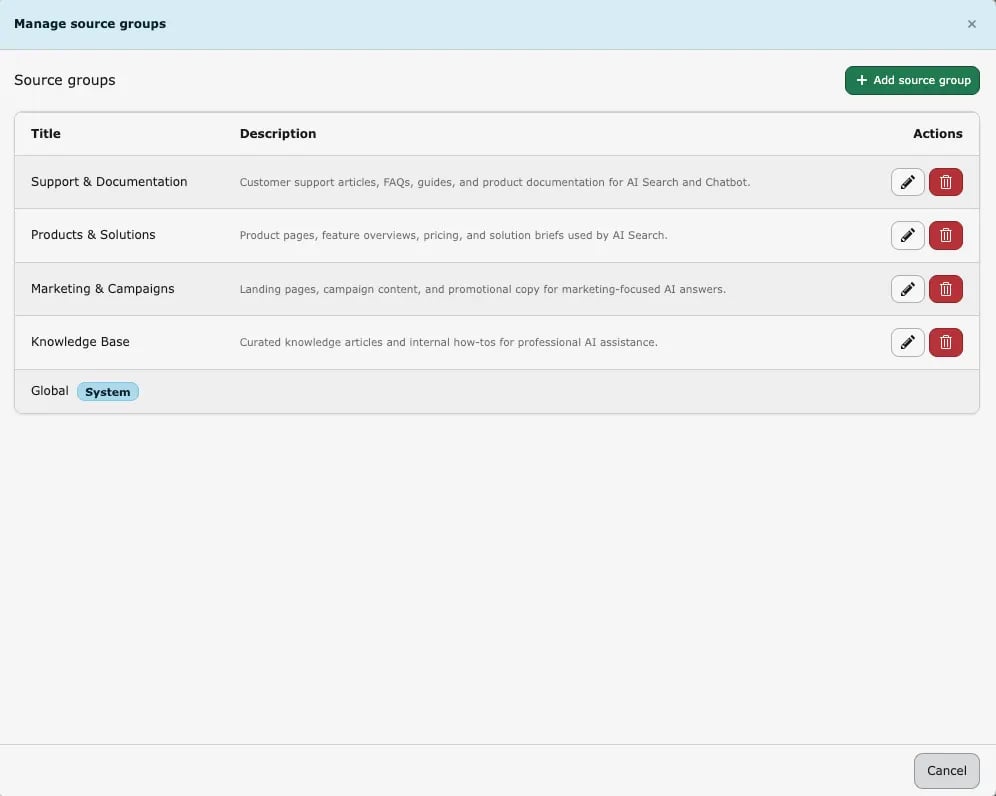
The Global Source Group is a system group and cannot be edited or deleted.
Assign Source Groups to Data Sources
When creating or editing a data source, users can:- select one or more Source Groups
- rely on the Global Source Group, which is assigned automatically
- configure the Used by field (formerly Type) to control where the source is available
- AI Search
- AI Chatbot
- Both AI Search and AI Chatbot
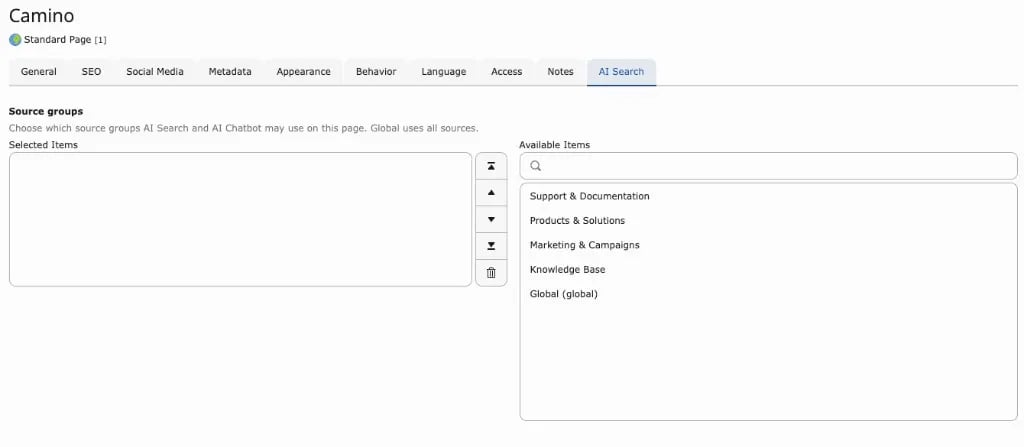
Page-Level Configuration (T3AS / T3AC)
- Open the desired TYPO3 page.
- Open Page Properties.
- Go to the AI Search tab.
- Find the Source groups field.
- Select the Source Groups that should be available on that page.
Practical Example
A company has separate documentation for Products, HR, and Internal Policies. Three Source Groups are created:- Products
- HR
- Internal
Source Groups only affect content retrieval. Existing training data, embeddings, vector indexing, and scheduled synchronization continue to operate normally.
If no custom Source Groups are selected, the Global Source Group remains available according to the configured behavior.
Header / Footer for Sitemap and Web-Page Source Types
These options help you keep repeated layout content out of the main page body while still making shared site information available to AI retrieval.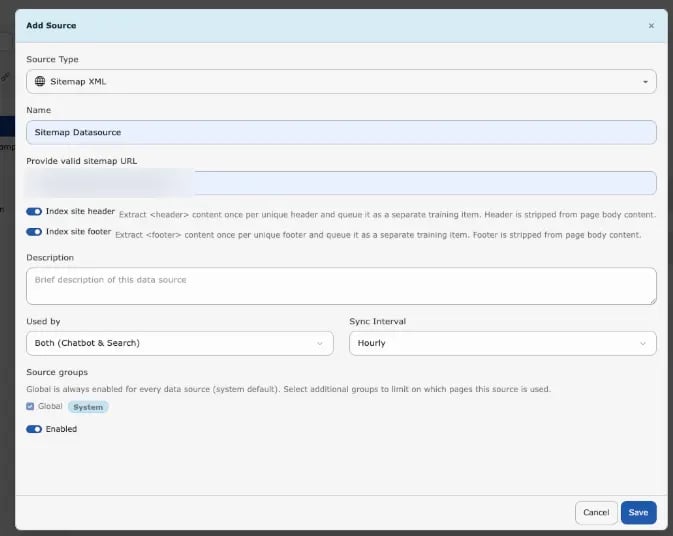
- extract the website
<header>content one time for each unique header - store that content as a separate training item
- remove the same header content from the page body before indexing
- reduces duplicate information across many pages
- keeps repeated navigation or shared header text from being indexed over and over
- preserves useful shared site information for retrieval
- when the header contains meaningful text that supports AI answers
- when many pages share the same header content
- websites with shared product navigation or service overviews in the header
- websites where the header contains reusable company or category information
- extract the website
<footer>content one time for each unique footer - store that content as a separate training item
- exclude that footer content from the page body during indexing
- prevents duplicate footer text from being trained again on every page
- keeps the main page content cleaner for retrieval
- preserves useful global site information such as company details or support links
- when the footer contains helpful shared text for search or chatbot answers
- when the same footer appears on many pages
- websites with shared contact details, policy references, or company summaries in the footer
- large sites where repeated footer content would otherwise be indexed many times
Enable Index Site Header and/or Index Site Footer in the data source form when creating or editing a Sitemap XML or Web Pages source.
- Sync does not run AI training by itself.
- Training is performed by the Scheduler task or manually (see Training Center).
Scheduler
T3AF Training is the shared console commandnst3af:training (AI Foundation / T3CS). It powers automatic indexing for AI Search (T3AS).
When you create a data source, T3AS will automatically create the T3AF Training Scheduler task for this site (if it does not exist yet) and run it at the frequency you set (e.g. Hourly, Daily, Weekly). You do not need to create the scheduler task manually—it is created when the source is saved and will execute according to the chosen sync interval.
From the Dashboard you can open the TYPO3 Scheduler and locate the automatic training task (typically named T3AF Training for this site). Use Run All or Run Task Now to process the training queue immediately.
When the scheduler runs this task for a site, it:
- Syncs enabled data sources for that site (crawl or refresh content into the training queue).
- Trains pending queue items (chunks content and generates embeddings via your configured AI provider or T3Planet Credits).
- Cleans up old completed/failed queue rows according to the retention setting (optional archive to CSV).
Sync in the Data Sources UI only marks content for refresh. It does not call the AI or create embeddings by itself. Embeddings are created when T3AF Training runs (scheduler, CLI, or Training Center actions that trigger the same pipeline).
Command nst3af:training — all options
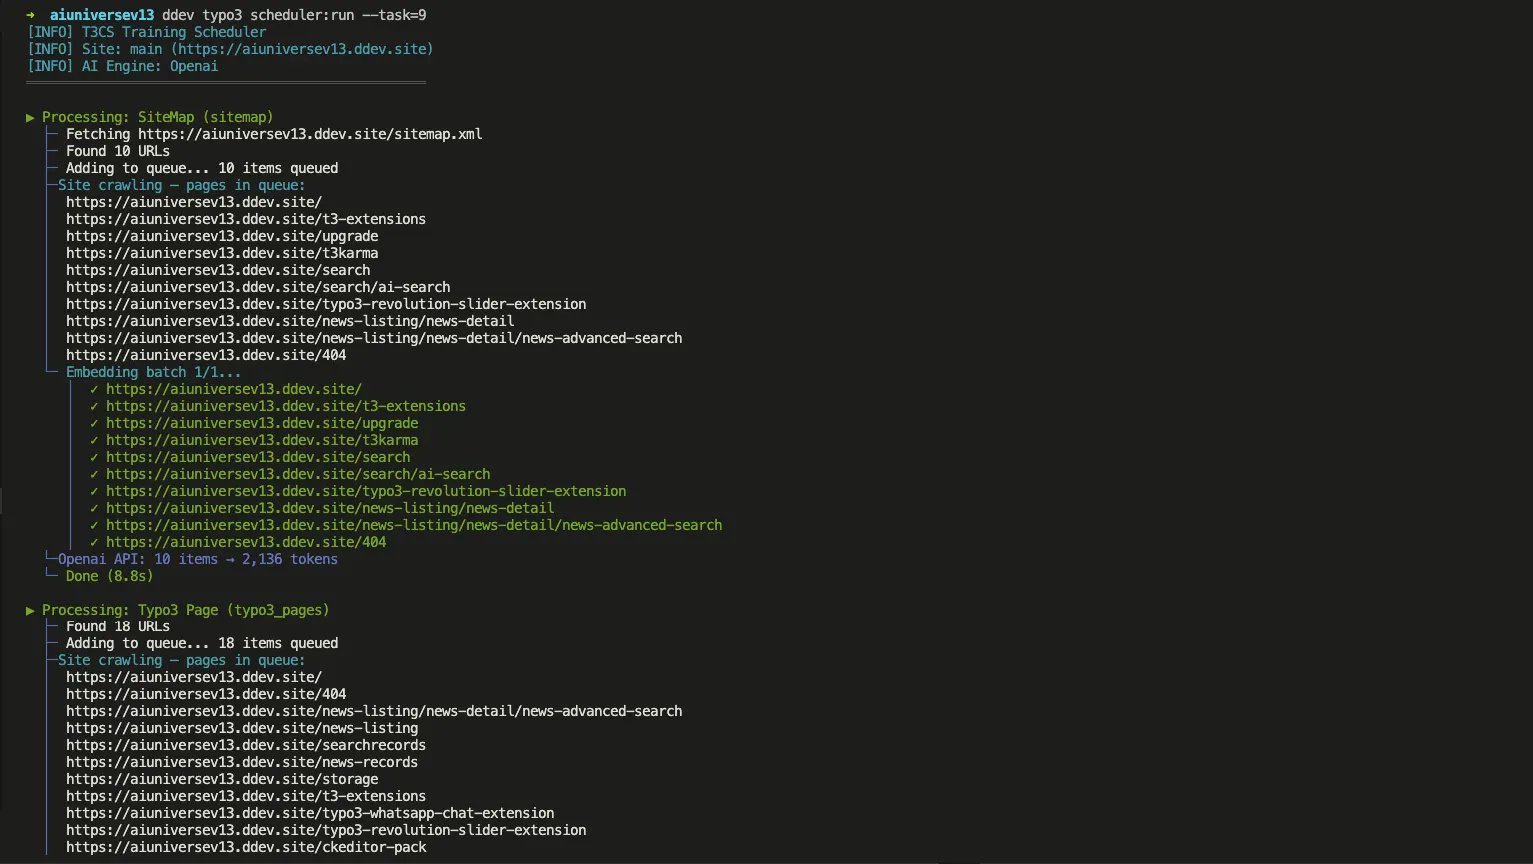
You can run the same command manually from the project root (for example with DDEV). Replace <rootPageId> with your site root page ID and <taskUid> with the numeric UID from the Scheduler module (do not assume a fixed ID such as 9).
Argument
rootPageId (optional when using scheduler:run --task=)
Site root page ID. Required for direct CLI runs unless the scheduler passes it via the task.
Options
--source=ID
Process only one data source (must belong to the site).
--detailed
Verbose output (each URL, PDF, and similar). Enabled by default on the automatic scheduler task. It will show the detailed progress in the CLI command.
--dry-run
Preview only — no API calls and no database updates.
--limit=N
Process at most N queue items per data source.
--batch-size=N
Embedding batch size (default: extension Batch size or 100). Set on the scheduler task from extension settings when the task is created or updated.
--skip-cleanup
Skip the post-training cleanup phase.
--cleanup-only
Run cleanup only (no sync, no embedding).
--retention-days=N
Delete or archive queue rows older than N days (default: extension Retention days or 30). Set on the scheduler task from extension settings.
--no-archive
Delete old queue rows without writing a CSV archive first.
--optimize-db
Run OPTIMIZE TABLE after cleanup.
--queue-failed
Move Failed queue items back to Pending before processing.
--force / -f
Re-train all: set all queue items (completed/failed/processing) back to Pending and process.
It does not automatically set sync_requested. Sync still requires the Sync action from the DataSource tab.
What the automatic scheduler task uses
Only rootPageId, --batch-size, --retention-days, and --detailed. All other options are for manual CLI or custom scheduler tasks you create yourself.
Example commands
Composer / TYPO3 v13+ (typical):
scheduler:execute instead of scheduler:run; see the TYPO3 Scheduler CLI documentation.
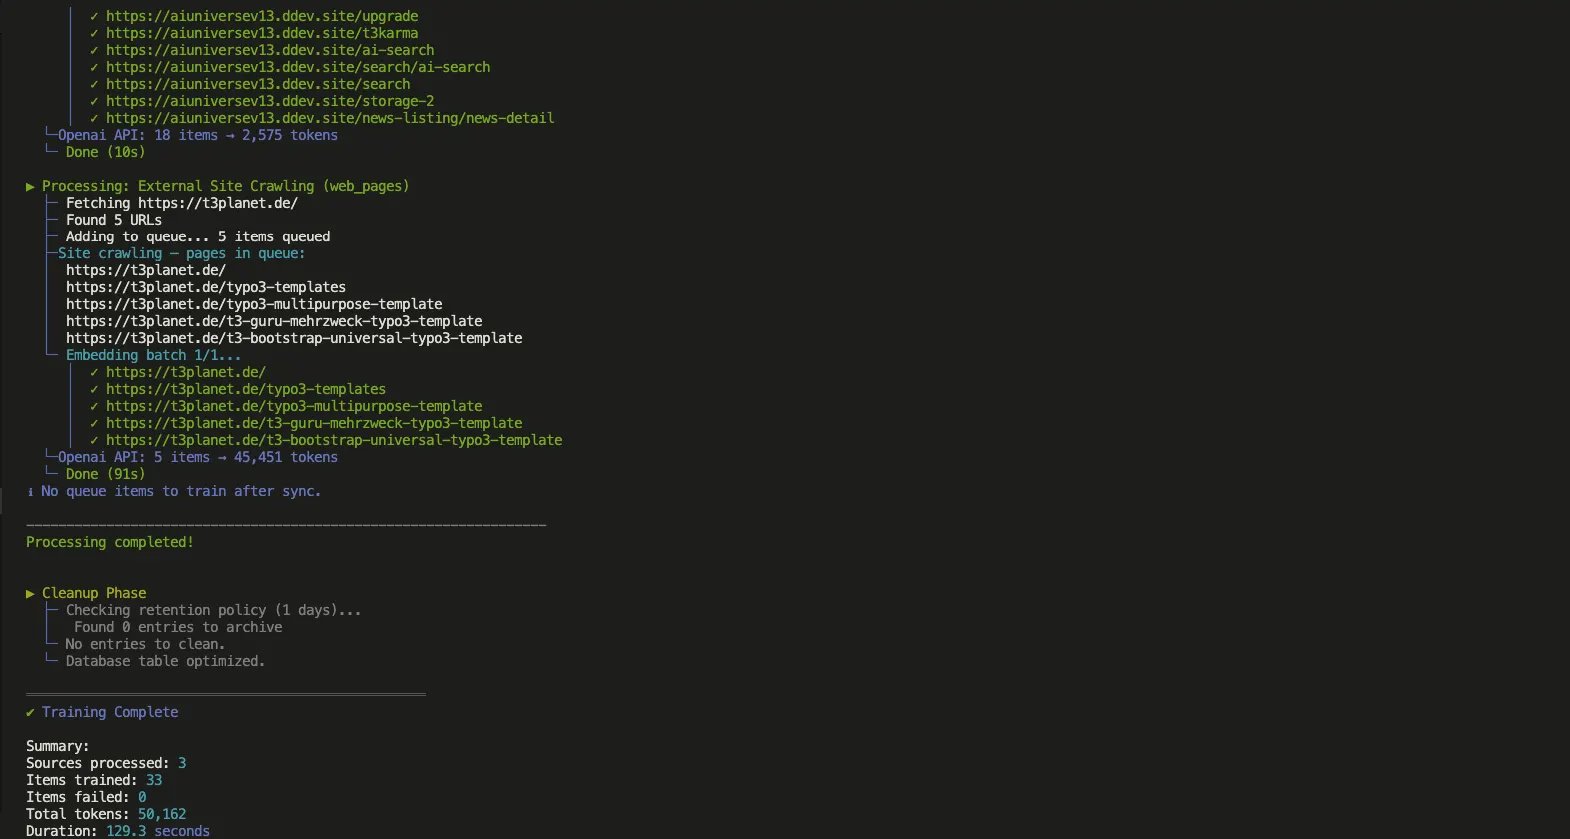
Extension settings used by training (AI Foundation → AI Features)
These T3CS / AI Chatbot & Search settings are applied when the scheduler task is configured:- Batch size →
--batch-sizeon the task - Retention days →
--retention-dayson the task - Chunk size, Max link crawl, rate limits — affect sync and embedding behavior during the run
- Log archive path (optional) — where cleanup CSV archives are stored
Command t3af:history:cleanup — history log cleanup
T3AF History Cleanup is the shared console command t3af:history:cleanup (AI Foundation / T3CS). It deletes AI Search and Chatbot usage history older than the retention period.
This is separate from training-queue cleanup (--retention-days on nst3af:training). Use it to keep Usage Analytics history within a privacy or storage limit.
If the task does not exist yet, create it in the TYPO3 Scheduler module:
- Create a new task and select Execute console commands.
- Choose
t3af:history:cleanup. - Set the days argument and the frequency on the Timing tab.
- Save the task.
days
Retention in days before deletion. Edit this argument on the scheduler task. Default is 90 when omitted.
Example commands
Composer / TYPO3 v13+ (typical):
days to 3 deletes usage history older than 3 days (CLI: t3af:history:cleanup 3).
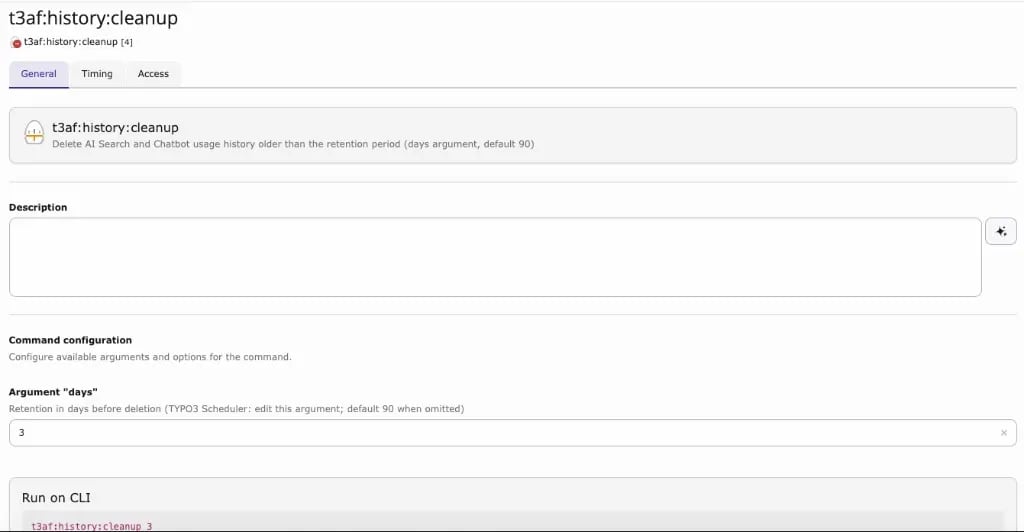
t3af:history:cleanup scheduler task. Default retention is 90 days when the argument is omitted.
More options for other AI Foundation scheduler commands (MCP cleanup, and so on) are listed under AI Foundation → Scheduler & CLI in the TYPO3 backend.
4. Training Center
Purpose View the training queue (items collected from all data sources) and control training and cleanup. What you see- Summary counts: Total items, Pending, Embedding (processing), Completed, Failed, and Tokens used.
- All Sources: List or summary of data sources and item counts.
- Training Queue table: Items with columns such as Item, Status, Tokens, Created, Actions.
- Filters: By data source, status (All Statuses), or search text.
- Actions: Select All, Delete, Re-queue (reset).
- Pending – Waiting to be processed.
- Processing / Embedding – Currently being sent to the embeddings service.
- Completed – Successfully trained.
- Failed – Error during training.
- Processes all Pending queue items (generates embeddings).
- Runs cleanup of old completed/failed items according to the retention setting.
- Only items in status Pending are processed when training runs.
- Processing means: the text is sent to the configured embeddings service, and the result is stored for search usage.
- After success, the item is marked Completed; on error, Failed.
- How often training runs depends on the Sync interval of your data sources and on the Scheduler actually being triggered (e.g. via cron).
5. Search tab
The Search tab controls AI search for the whole site. Here you turn search on, set how answers look, enable Save search history, style the widget, and manage suggested questions. Settings on a single page plugin can override these defaults. Step 1: Open the T3AS module. Step 2: Click the Search tab. Step 3: Configure Settings, Widget, and Questions. Settings Turn AI search on and control answer behaviour.- Enable AI Search Globally — Activates semantic AI search across the site
- Enable Voiceover — Adds a play button so visitors can hear the answer read aloud
- Save search history — Stores visitor search queries and answers for analytics
- Enable Reference Links — Shows source links below the answer (pages, PDFs, etc.)
- Enable Search Feedback — Shows thumbs up/down; ratings appear in Usage Analytics
- Enable Chatbot Mode — Lets visitors ask follow-up questions
- Result Style — Summarize (short) or Long Answer (detailed)
- Search Class — CSS class or ID of the third-party search input used when injecting the AI overview (ke_search, indexed_search, or Solr). See inject-ai-search-results.
- Instructions — Custom system instructions for how the AI should write answers
- Widget Mode — How the widget opens (e.g.
Modal Box (Centered)) - Widget/Modal Trigger Button Position — Trigger button position (e.g.
Left (bottom)) - Trigger Button Size — Size of the floating trigger button
- Search Icon — Icon on the search box or trigger
- Trigger Button Background — Background style of the trigger button
- Select Style — Default Style (site colours) or Customized Style (plugin)
- Border Radius — Corner roundness (e.g.
Semi Rounded) - Select Loader — Skeleton Loader or Typing Loader while the answer loads
- Primary Color / Secondary Color / Text Color — Only when Customized Style is selected
- Recent Search — Shows the visitor’s previous searches in the search box
- Search Form Type — Input layout (e.g.
With Button) - Button Type — Search Icon or With Label
- Predefined Questions — Enable suggested questions
- Question Position — Where they appear (e.g.
Bottom Search) - Number of Questions to Show — How many to display (e.g.
5) - Questions Storage Folder(s) — Page ID of the folder with question records (e.g.
681)
These settings apply site-wide. To override them on one page, use the T3AS Search frontend plugin. See ../FrontendPlugin/Index.
6. Usage Analytics
The Usage Analytics tab records visitor search activity. You can see what was searched, what answer was given, feedback ratings, and reference links used. Step 1: Open the T3AS module. Step 2: Click Usage Analytics. What you see Each row in the log list shows:- Search term — What the visitor typed
- AI answer — Short summary of the result
- Module — e.g. Search
- Feedback — Thumbs up or down (when Search Feedback is enabled)
- Reference links — Number of source links shown
- Page, language, time — Where and when the search happened
- Negative feedback and any visitor comment
- Search badge — Click to filter logs by that search term
- Reference sources — Pages or files used to build the answer
- All messages — Full chat history (when Chatbot Mode is on)
- Delete This Log — Remove a single entry
- Search queries or responses — Find text in the logs
- All Modules — Filter by module (e.g. Search only)
- All Languages — Filter by language
- Export — Download log data as a file
Enable Save search history in Search → Settings so visitor queries and answers appear in this log.
Enable Search Feedback in Search → Settings or in the plugin Search Results tab to collect thumbs up/down ratings.
To delete old usage history automatically, use the
t3af:history:cleanup scheduler task (see Scheduler on this page). Default retention is 90 days.7. AILogs
Purpose View log entries for the current site, including sync, training, and error events. What you see- Search: Use the search box (for example:
Search in message...) to find specific log text. - Channel: Filter by channel (default:
[all]). - Level: Filter by log level (for example:
Any, Error, Warning, Info). - Max rows: Set how many rows are shown per page (default:
50). - Entry count: The page shows a summary like Showing up to 50 of 745 entries per page.
- Log table columns:
- Time
- Level
- User
- Details
8. AI Statistics
Purpose View AI API usage statistics for the current site. What you see- API Usage summary for your search activity.
- API Requests count.
- Tokens usage details:
- Total tokens
- Context tokens
- Generated tokens
9. AI Prompts
Use AI Prompts to control how T3AS writes answers, summaries, and search-related responses. This is useful when you want search output to follow a consistent tone, answer style, or instruction set across the whole site. Best practices:- Keep instructions focused on answer quality, tone, and length.
- Test prompt changes with real user questions.
- Review AI Foundation AI Prompts when you want shared prompt behavior across multiple AI Universe extensions.
10. Providers & MCP Tools
T3AS uses AI Foundation for shared provider setup and MCP-based integrations. Review this area when you need to confirm that the correct provider, model, and MCP capabilities are available for search and training workflows. See also:Solr Settings
If the selected search engine is Solr, please provide the following details in case your Solr server is secured with HTTP authentication.- Solr Username Username for Solr authentication.
- Solr Password Password for Solr authentication.
Hosted-Solr Server Integration for Solr
The Hosted-Solr Server feature enables you to connect your TYPO3 instance directly to the Hosted-Solr service for improved search indexing and data retrieval. The following guide outlines how to configure T3AS and Hosted Solr in your TYPO3 instance using the Site Configuration module.- Step 1: Open Site Configuration
- In the TYPO3 backend, navigate to Site Management → Sites
- Edit site configuration
-
Step 2:Scroll down to the Solr section in the same T3AS tab and Configure Solr Integration
- Hosted Solr Server: Enable this checkbox.
- Hosted Solr Cores: Enter one or more Solr cores separated by commas
(e.g.,
core_en,core_de).
- Step 4: Define Solr Connection Settings
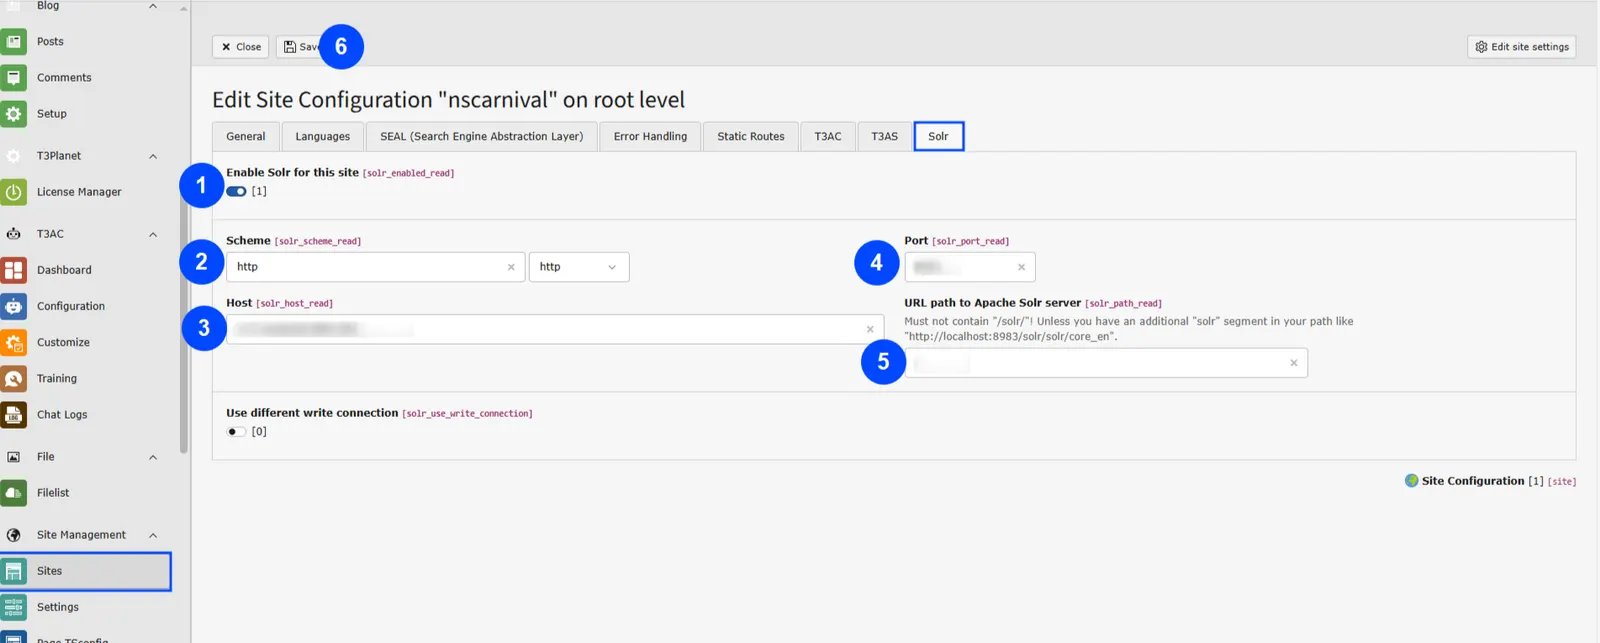
- Switch to the Solr tab within the Site Configuration.
- Enable the Enable Solr for this site option.
-
Provide the connection details:
- Scheme:
httporhttps - Host: Enter your Hosted-Solr host address
(e.g.,
562d8a85dc0-icy-tree-111:eecbaaae879b@node-14.hosted-solr.com) - Port: Usually
443for secure connections - URL Path: Provide the Solr path without
/solr/(e.g.,/562d8a85dc0-icy-tree-111/)
- Scheme:
- Step 5: Save Configuration
Getting Started
- Create an Account: Sign up on the Hosted-Solr platform using your email address.
- Create a Solr Core: Once your account is active, create a new Solr core.
- Configure in TYPO3: Add your Solr core connection details within the TYPO3 Site Settings.
Verifying the Connection
After configuration, ensure that Solr is properly connected:- Navigate to the Info module inside the Solr tab within your TYPO3 backend.
- Verify that the Solr connection status and indexing information appear correctly.
Additional Fields Support
The extension now supports fetching additional fields from Solr beyond the standard predefined set. This means you can include custom or project-specific fields in your search configuration to enhance indexing and display flexibility. Configuration Steps- Go to AI Foundation → AI Features and open the T3AS feature card (or the related T3AS Solr settings in your project setup).
- Specify which fields should be retrieved from Solr.
- Save your settings to enable greater control over search results and data output.
Several default fields are automatically included for content retrieval from Solr:
id, site, type, uid, content, pid, url, changed, and access. Ensure that Solr is properly configured and that the content field is available in your Solr-indexed data.