Configuration
Step 1: Open AI Chatbot in the TYPO3 backend. Step 2: Click the Chatbot tab. Step 3: Enable the chatbot, then configure feedback, Save chatbot history, messages, and instructions.Settings
Turn the chatbot on and control how it greets visitors and whether Save chatbot history is enabled.- Enable AI Chatbot — Activates the chatbot on your site
- Chatbot Feedback — Shows thumbs up/down on responses; ratings appear in Usage Analytics
- Save chatbot history — Saves conversations for analytics and past chats. Turn this off for stricter privacy.
- Title — Name shown in the chatbot (e.g. AI Chatbot)
- Short Description — Brief text describing the assistant
- Bubble Message — Trigger bubble text (e.g. “Hey there, How can I help you?”)
- Welcome Message — First message visitors see (e.g. “Hi, how can I help you?”)
- Chatbot Language — Default language for the chatbot
- Chatbot Instructions — Custom rules for how the chatbot should answer
AI Prompts
Use AI Prompts when you want to refine how the chatbot greets users, answers questions, follows project-specific rules, or stays within the right tone. This is useful when different websites or teams need chatbot output to stay consistent without editing the answer manually every time. Best practices:- Keep instructions short and easy to test.
- Use prompts to define greeting style, answer tone, and response limits.
- Test prompts with real user questions before rollout.
- Review AI Foundation AI Prompts when you want shared prompt behavior across multiple AI Universe extensions.
Customization
Open the Customize tab to match the chatbot appearance to your website. Changes appear in the live preview panel.- Upload Logo — Add your company logo to the chatbot header
- Upload Avatar — Set the chatbot profile image
- Avatar Size — Adjust the profile image size with the slider, then check the preview
- Chatbot Color — Choose the chatbot appearance color
- Show Logo — Show or hide the logo in the chatbot
- Show Date & Time — Display the current date and time in the chat
- Transparent Trigger — Make the chatbot trigger appear more discreetly on the page
- Chatbot Position — Reposition the widget (e.g., bottom-right)
- Widget Bottom Space — Set the distance from the bottom of the page (min: 15px, max: 200px)
General
Open the General tab to control where the chatbot appears, whether source links are shown, and how custom CSS is applied.Page Visibility
Use Page Visibility to decide on which pages the chatbot is shown.- You can show the chatbot only on selected pages.
- You can also hide it on selected pages, even when it is enabled globally.
Show Chatbot on Specific Pages
Use this option to show the chatbot only on pages you choose.- Enter page IDs in a comma-separated list.
- Example:
10, 22, 35 - The chatbot will be visible on these pages.
Hide Chatbot on Specific Pages
Use this option to hide the chatbot on specific pages.- Enter page IDs in a comma-separated list.
- Example:
45, 60, 72 - These pages stay hidden even if chatbot is enabled globally.
Sources Links
Enable Source Links to attach reference URLs to chatbot responses based on the data used. When enabled, the chatbot adds clickable links from indexed sources (for example TYPO3 pages or documents) used to generate the answer. How it works:- The system retrieves relevant content from configured data sources.
- The response is generated using this content.
- Source URLs are mapped and added as clickable links.
Custom Styling
Use Custom Styling to match the chatbot design with your website style.- Add your custom CSS for colors, spacing, and font styles.
- Keep styling simple for better readability and user experience.
Custom Internal CSS
Use this field when you want to apply CSS directly inside the chatbot widget. Example:External Embed
If you would like to use this chatbot on another domain, follow these steps:- Open the External Embed area in T3AC.
- Add the allowed domain, or enable the option that allows any approved domain policy used by your project.
- Copy the embed code.
- Paste the code inside the
<body>tag of your website.
Multilanguage
Configure your chatbot to support multiple languages directly from the Configuration tab by selecting the default language from the dropdown menu. Only the languages that have already been added to your domain will be available for selection.Basic Authentication Support
If you want to crawl URLs protected by htaccess / HTTP Basic Authentication, enable Basic Authentication Support and enter the username and password. Open T3AF → AI Features → Access & Notifications, then enable the option and save your changes.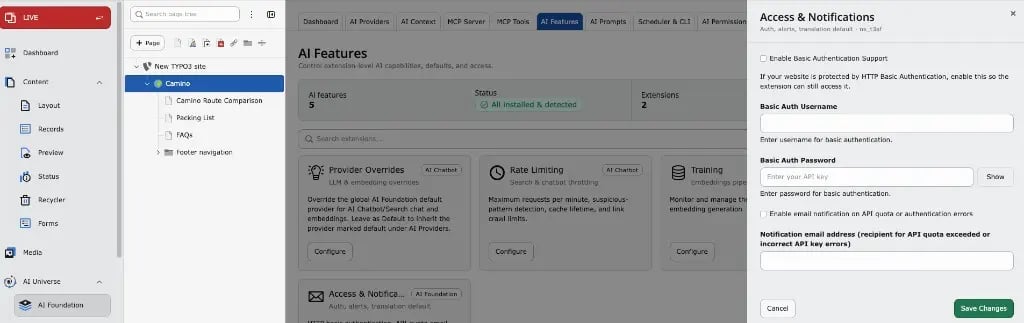
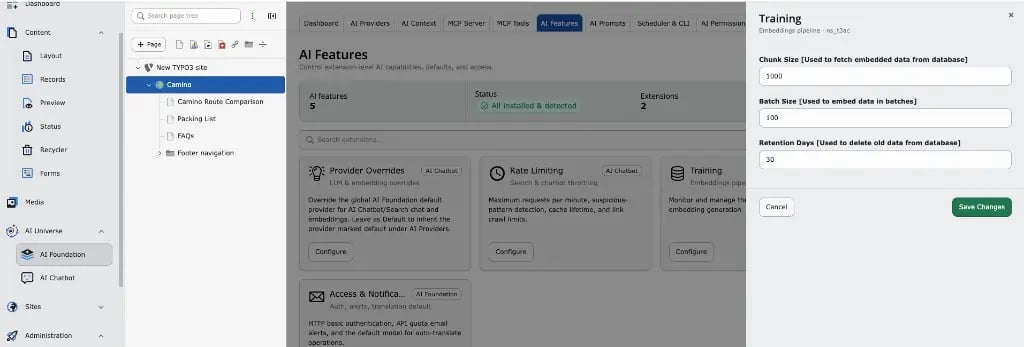
Configurable Database Chunking for various types of Dataset Processing
Overview- This feature provides configurable database chunking to efficiently process large datasets while maintaining optimal performance and stability. Instead of loading all records in a single query, data is fetched and processed in smaller chunks, reducing memory usage and preventing execution timeouts.
- The chunk size is configurable via the T3AF feature settings, allowing administrators to adjust it according to server capacity and dataset size.
- By default, database chunking is enabled with a chunk size of 1000 records.
- If required, this value can be modified in T3AF → AI Features → Training to better suit the execution environment.