

Translation is supported only for TCA-based fields. Fields are considered translatable when the 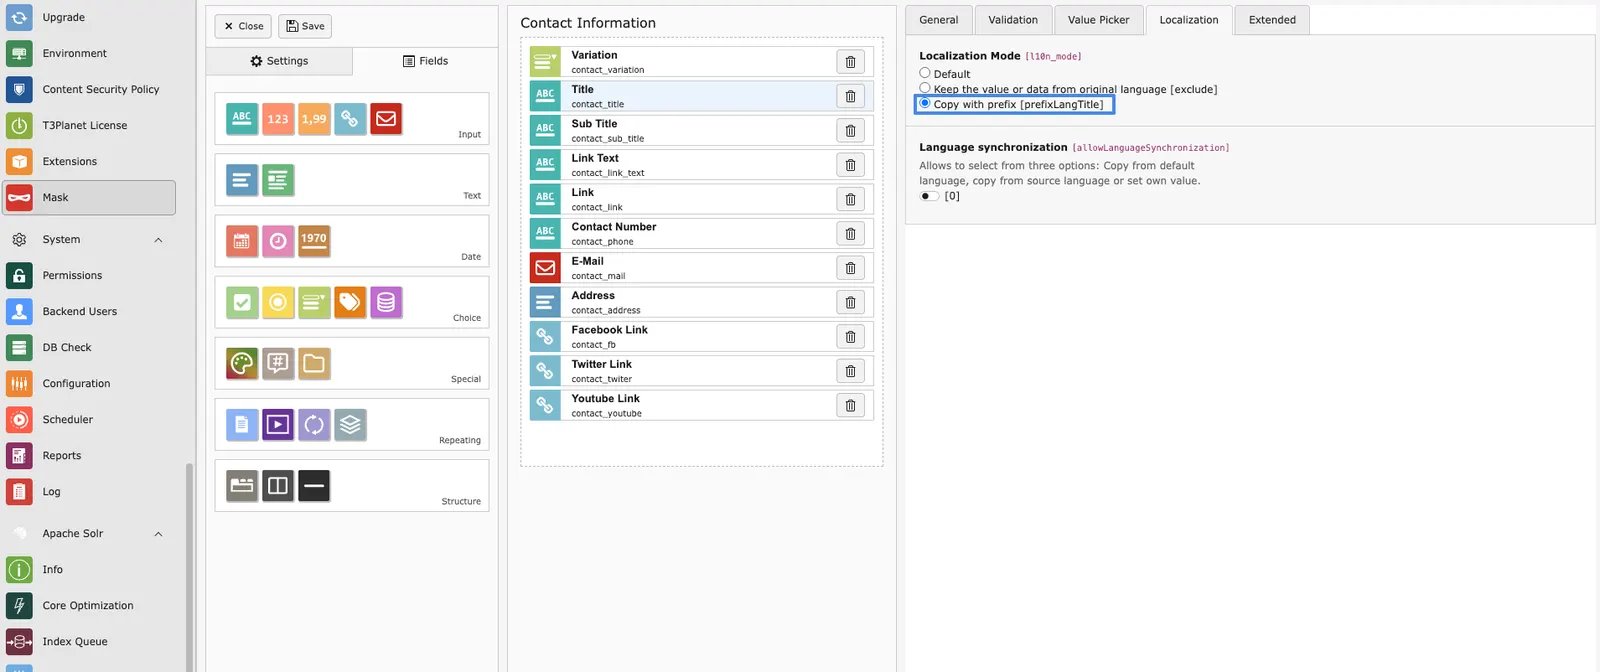
l10n_mode is set to prefixLangTitle. This functionality is implemented via a DataHandler hook, which applies exclusively to TCA records and does not support FlexForm fields by default.For Mask elements, ensure that the option Copy with prefix [prefixLangTitle] is enabled for each field that should be translated. Without this configuration, the fields will be ignored during the translation process.FlexForm translation is supported only when using the Standard FlexForm Structure. Custom or non-standard FlexForm configurations may not be processed correctly.For more details, refer to the TYPO3 official documentation: Standard FlexForm StructureAdditionally, Flux-based content elements support translation only after the content element has been created and saved at least once.
Mass Translation
The Mass Translate module is designed to manage and schedule translation tasks for multiple pages. With this feature, you can select or deselect languages, or delete scheduled translation tasks. Key Features:- Manage a list of scheduled translation tasks.
- Change target languages for mass translation.
- Automate translation for multiple pages at once, saving time and effort.
Manage Mass Translation
The Manage Mass Translation module lets you queue, configure, and monitor translation tasks for multiple pages from one place. Open it from AI Assistant → Translation → Manage Mass Translation. Key Features:- Select pages and add them to the translation queue.
- Configure target languages for mass translation and save the language mapping.
- Remove pages from the queue when they are no longer needed.
- Re-queue failed translation jobs so they can run again.
- Filter the queue by status: Pending, Completed, Failed, or All.
- Filter by site root or view pages across all sites.
- Add pages to the queue by page ID and choose the target language.
- Run the related Scheduler task to process queued translations.
- Open AI Assistant and go to the Translation tab.
- Click Manage Mass Translation.
- Select the pages you want to translate (or use Add pages to queue and enter a page ID).
- Open the language configuration, select the target languages, and click Save.
- Review queue tabs (Pending, Completed, Failed, All) as needed.
- Use Re-queue failed if any jobs failed and should be retried.
- Open Scheduler and run the mass translation task to process the queue.
t3af:bulk:translate — Translate pages from bulk translation queue
Configure these command options in the Scheduler task settings:
- batch-size — Number of pages processed per batch within one run.
- limit — Cap one run at N pending queue pages; the rest stay for the next scheduler tick.
0= unlimited.
 Example: set batch-size to
 10 and limit to 10 so each scheduler run processes up to 10 pending pages in batches of 10. Remaining pending pages stay in the queue for the next tick.
One-Click Page Translations
This feature allows you to translate pages and their content elements from the default language to other languages. There are two options for Translation- Translate Page: This option allows you to translate the page into the selected or all other languages, but it only translates the pages, not the content.
- Translate Page and & content: This will Translate the Page along with its content from Defualt language to Selected/All languages
Translate Pages
- Go to Your TYPO3 Page, Then Translate Your Content element.
- Go to your TYPO3 page and select the content element you want to translate.
- Click on “Translate with AI.”
- Choose your preferred AI model for the translation.
- Select the elements you want to translate
- Click the “Translate” button.
News Translation
Expand your knowledge base with News Translations. Click ‘Translate with T3AI’ to get translated news directly in your backend. Step 1 - Go to the List module and choose the storage folder from the News list. Then, select the news item you want. Step 2 - Localize Your Page in Your Preferred Language- Open the Page Module and select your page.
- Click the “Translate with T3AI” button.
- Choose your AI model and click “Translate.”
To ensure proper news translation, always set the container type to News in the News folder.
- Go to the News folder in the TYPO3 backend.
- Open Edit Page Properties.
- Navigate to the Behaviour tab.
- Set the Container Plugin to News.
Records TCA Translation
Looking for a quick solution to transform your data and language? This T3AI feature lets you easily translate your records and data into different languages using a user-friendly tool. Note: We recommend using GPT-4.0 for better results. Step 1 : Open your TYPO3 backend and go to the List module. Step 2 : Select the page from the page tree. Step 3 : Click on “Translate with T3AI.”- Choose the model for translating your TYPO3 TCA records.
- Click the “Translate” button.
- Edit the translated page.
- On the top bar, click the “Translate with T3AI” button.
- Click the “Translate” button.
- Save your translated records.
Extend Records Translation
ns_t3ai supports translation of specific fields of TCA records. It understands fields which need to be translated, only if their l10n_mode is set to prefixLangTitle. For detecting translatable fields, ns_t3ai uses a DataHandler hook. The following setup is needed, to get ns_t3ai work on your table:<extension_key>/Configuration/TCA/Overrides/<table_name>.php
Re-Translate Pages
Forget about tedious manual translations. With one click, you can refresh and redo your translations instantly. No more manual translation is needed! Just click the ‘Re-Translate’ button. It will delete the current translations and start the language wizard to begin the translation process. Step 1: Go to the “Page” tab and click on “Pages.”- Click the “Re-Translate Page” button.
- Choose your preferred AI model for translation. i.e Translate with ChatGPT4.0
- Select the elements you want to translate.
- Click the “Translate” button.
- Your content will be re-translated!
- Click on “Edit Content.”
- If you want to re-translate the page, select the AI model from the top bar.
AI translation
T3AI translations Some features for Page/ Content translation. follow below steps to Use this features- Step 1 - go to Page module select the page
- Step 2 - select the page & click on edit Page property
- step 3 - go to Tab T3AI
Mass Pages Translation
Update numerous translated pages simultaneously. Refresh your website content using precise, current AI-driven translations.For Mass page translation, in all pages Allow Mass translation option should be enabled and if you add new pages do not forgot to perform step 5.
- Step 1 - go to page module
- Step 2 - Select the page & Click on edit page properties
- Step 3 - go to tab T3 AI
- Step 4 - Enable option Allow mass translation
- Step 5 - click on drop Down T3AI> Go to Mass translation> Click on Add this page to scheduler queries
Run Mass Translation: From TYPO3-CLI
T3AI Mass Translation feature allows users to efficiently translate multiple elements or entire pages into different languages simultaneously.This is typically useful in multilingual websites where translating individual elements manually would be time-consuming. To run a mass translation from the CLI (Command Line Interface), follow these general steps- Step 1: Go to your command line/Terminal.
- Step 2: Run the following command
Recursive Mass-Translate
It will Translate all pages from the default language into other languages with one action, simplifying the translation process,follow below steps to use this featureFor recursive mass translation, ensure the mass translation and Recursive Mass Translation option is enabled for all pages and follow step 2 when adding new pages.
- Step 1 - Please Enable “Allow Recursive Mass-Translate?” from Root page property
- Step 2 - Select root page > click on drop Down T3AI > Go to Mass translation> Click on Recursively add this page to the scheduler queue
Auto re-Translate Page
This feature Automatically translate pages and content from the site’s default language to all other languages, ensuring consistency,follow below steps to use this feature- Step 1 - go to page module
- Step 2 - Select the page & Click on edit page properties
- Step 3 - go to tab T3AI
- Step 4 - Enable option Allow auto translation
Language Glossary
The Glossary feature lets you define source terms and their target-language replacements for AI translations. This keeps terminology consistent across pages and languages. Open it from AI Assistant → Translation → Manage Glossary. How to Add Glossary Terms:- Open AI Assistant and go to the Translation tab.
- Click Manage Glossary.
- Enter the source term (for example, “TYPO3 Developer”).
- Enter the target term for the selected language (for example, “TYPO3 Agency”).
- Select the Target language (for example, German
[de]). - Click Save to store the glossary entry.
- Set glossary terms per language so translations automatically use the correct replacement.
DeepL Official Glossary
T3AI also supports DeepL Official Glossary mapping. Use this when you translate with DeepL and want DeepL glossaries applied for specific language pairs.DeepL Official Glossary works with the DeepL provider only.
It is not applied when you translate with other AI providers (for example, ChatGPT).
- Open AI Assistant and go to the Translation tab.
- Click Manage Glossary.
- Open the DeepL Official Glossary tab.
- Select the target language.
- Select the DeepL glossary to map for that language pair.
- Click Save mapping.
- Optionally open the saved mapping (eye icon) to review the details.
 Frontend image without preview mode
 Backend Image
Preview mode image
Backend Image
Preview mode image
 Frontend image without preview mode
Activate Translated Content
Tired of spending time manually enabling or disabling translated content on your TYPO3 pages? T3AI makes it easy and quick! By default, translated content is turned off, but with just one click on the “Activate Translated Content” button, you can instantly enable it. Save time and let T3AI handle the work for you! Step 1: Open your TYPO3 backend. Step 2: Go to the Page module and select a page from your page tree. Step 3: On your TYPO3 page, choose the language layout. Step 4: Translate your page with T3AI. Step 5: Click the “Translate with T3AI” button. Step 6: Once the page is translated, simply click the “Activate Translated Content” button. With one click, all your disabled content and elements will be activated. After translation, this feature controls how hidden content elements are handled.- Enabled: All hidden content elements are automatically activated in every language after translation.
- Disabled: Only those content elements that were active in the main language before translation are activated afterward.
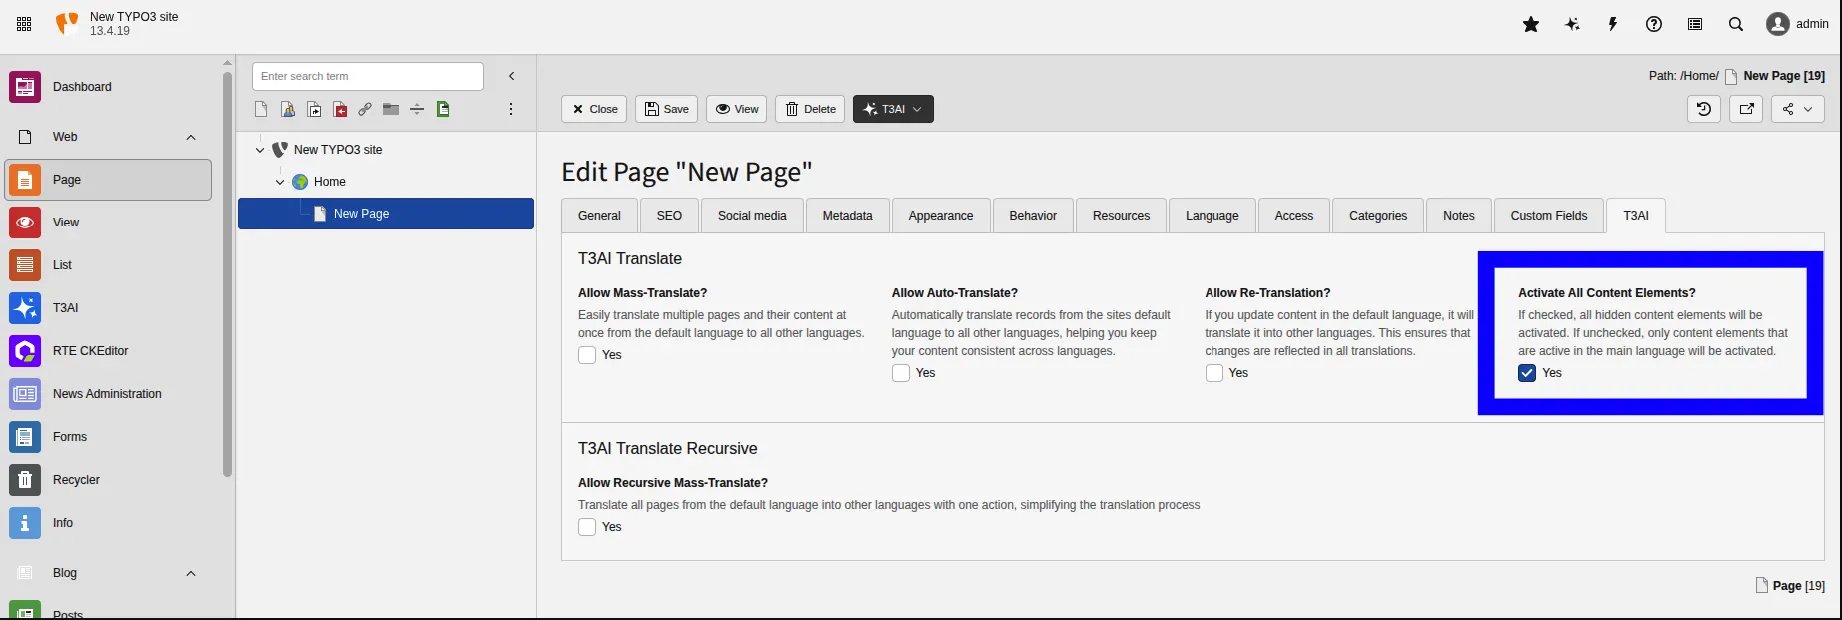
- Open the desired Page in TYPO3.
- Click Edit Page Properties.
- Navigate to the T3AI tab.
- Enable the Activate All Content Elements option.
Auto Activate All Content Elements
After translation, this feature controls how hidden content elements are handled.- Enabled: All hidden content elements are automatically activated in every language after translation.
- Disabled: Only those content elements that were active in the main language before translation are activated afterward.
How to Enable
Follow below steps to enable this feature.
- Open the desired Page in TYPO3.
- Click Edit Page Properties.
- Navigate to the T3AI tab.
- Enable the Activate All Content Elements option.